It’s late spring, or maybe it’s middle of the summer… you come home and notice one or more sections of your landscape are dying. The easy solution would be to call a landscape professional to find out what’s causing the damage. But if you’re a do-it-yourselfer, chances are you’re going to try to find out what the problem is on your own. For that, you’ll want to use a multimeter. Sections drying out and dying mean that one or more of your irrigation valves are not coming on. The problem can be due to a bad controller, bad/torn or ripped wires, or a bad solenoid. Always begin the test with the easiest to troubleshoot.
Here are some simple steps to test your irrigation system with a multimeter:
1. Open the controller box. Make sure that all wires are connected and make certain that there is a battery for backup power. If any wires are loose, use a small Philips head screwdriver to reattach them to the controller. Test all stations and see if they turn on. Whichever zone doesn’t come on, use your multimeter to figure out what the problem is.
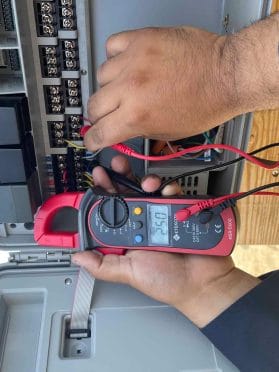
2. Turn on the multimeter with the arrow on the voltage setting, usually a (V~) symbol. Touch one lead tip from the multimeter to the screw of the common wire, usually the white wire; it says COM on top of the wire. Touch the other lead tip to the screw of the wire of the zone/zones that are not coming on. The multimeter leads will be red and black. It doesn’t matter which color lead goes to which wire, but for continuity purposes, touch the black lead to the common and the red lead for all the other wires. The reading should be between 22-28V. Anything below that means the controller is malfunctioning.
3. If the reading is between the normal range, turn the multimeter dial to ohms (Ω). Detach the defective wire from the controller. Touch the lead tip to the wire and the other to the common and get the reading. The range should be between 20-60 ohms. Above 70 ohms and the wire is either cut or it has a bad connection; below 10 ohms and the solenoid is shortened. Replace the solenoid if it’s below 10. If it’s above 70, follow the next step.
4. The last step is to reconnect all the wires to the timer and turn on the defective zone manually from the controller. Go to the valve that isn’t coming on and find the solenoid. Usually there will be wire nuts or electric cable where the cables meet. Remove those and touch a lead to both cables. It doesn’t matter which color touches what cable. The reading should be around 24V. If it’s not, the wire has to be dug up and replaced. If you got to this step and found out it’s a wire issue, I would recommend calling a professional to track the wire. They are usually underground about 6-8 inches and you’ll be digging around aimlessly trying to find the tear. At Groundcare Landscape, we have Certified Irrigation Technicians who are trained to track wires and know where the breaks are. Reach out to us for help!
